

Here we are with an airframe which is nearly finished and what a journey it has been. I really wanted to like this kit but with fit and other issues pretty much all the way through it has plummeted in my estimation through a slow process of erosion.

Getting to this stage has entailed too many compromises where I've had to say 'this'll have to do'. I've already enumerated the various problems with the interior and with the mismatch between the size of the fuselage halves and these issues have continued pretty relentlessly.

My advice is to assume that nothing will fit and adjust your approach to the build accordingly. Some things will fit but taking the line that they might not will save a lot of trouble. Having said this, test fitting is somewhat difficult because the Lysander's unusual design, with the high wing supported by struts which feed into spats around the fixed undercarriage, means that test fitting is difficult, to say the least. This is before we get to the issue of the complex canopy construction and its interaction with other parts such as the wings and the cockpit cage. As a result there is only so much one can test in advance. This isn't a problem with a kit which more or less fits, but with a model where parts which fit are the exception rather than the rule, it means you're confronted by a difficult build.

Could this be the result of my modelling skills? Well it's a possibility, so for instance it could be that some of the later problems with fuselage parts not fitting were generated by mis-alignment of the cockpit cage, so creating a knock-on effect. Yet, as we'll see, this doesn't really work, plus the problems with fit and alignment also apply to sub-assemblies which are not part of the fuselage build. I'd like to think that my constructions skills are not so consistently incompetent that I can't build even the most basic sub-assembly. I'm forced to conclude that the problems are inherent in the kit and frankly Eduard are being let down by their adoption of a limited run kit by another company. When looked at in the round, the addition of some PE, a few resin parts and some canopy masks doesn't compensate for a base kit which isn't close to the standard of the kits designed and manufactured by Eduard themselves.

So here is a point-by-point breakdown of the progress and the various things to watch for with this kit:
1. I returned from holiday to find that the fuselage halves had separated just behind the gunner's position. The split ran the length of the fuselage to the point where it joined the tail. I therefore clamped the fuselage again and glued using Mr Cement S. This was then left for several days and there have been no subsequent problems.

2. I had to bite the bullet and get down to more sanding of the line created by the mismatch between the fuselage halves. This encompasses the entire seam line marking the join between the two halves. There are also problems with uneven surfaces and gaps. As as result I used Mr Surfacer 1000 and then 500 on the deeper problems then sanded back using ever finer grades of sanding sticks. This is my least favourite part of any build but it's a question of getting the surface you want and not being afraid to sand until you get it.

3. The spats. According to the instructions the background to the light can be fitted after the spats have been constructed, with the clear part fitting over this. Test fitting of both spats made it clear that this simply wasn't going to happen so it was then a question of attempting to fit the part to one half of the interior before joining the halves together. The trouble is that no matter how you do this, the part simply isn't going to fit without leaving visible gaps. It would probably be best to blank this area off with plastic card but it was too late by the time I realised this. Once the spats are constructed there is a lot of filling and sanding to do, notably the seam line which is quite pronounced. After this fitting the clear parts is a challenge, because they tend to drop into the space and disappear. In addition, the lights on the original airframe fit in such a way that the glass forms a continuous curve with the surrounding metal, but Eduard have simply supplied domed and circular clear parts, so there is no way in which they can replicate the fit of the originals. Without alternatives to hand I stuck with the kit parts but the fit is terrible. This of course means that the fit of the PE surround to each light is also terrible.

4. The attachment points built into the spats for the wing struts and the bomb racks are rather vague and test fitting with the struts reveals that they are simply not going to work. It's worth taking the opportunity to drill out these attachment points at this stage rather than leaving it until later, when you're wrestling with fitting the wing. I started with a 0.8 mm drill bit and and worked upward from there, eventually arriving at a 1.8 mm drill bit before the parts fit together properly.
5. PE parts for the bomb racks. Officially called the Universal No. 1 Carrier, but also referred to as stub winglets, stub wings, detachable bomb carriers, light series carriers and stub wing bomb racks, although various of these terms actually refer to the racks separately from the stub wing. I'll go for the easy option and use 'bomb racks' to refer both to the attachment points for the bombs and the winglet. This is the area for which the extra PE set was bought and, for once in this build, it didn't disappoint. The set is delicate but surprisingly straightforward and provided one of the few aspects of the build which went consistently well and with which I was pleased at the end.
6. Building the wings: various builds suggest that the attachment point where the strut joins the wing will leave the wings drooping, so the hole needs to be filled and a new attachment point should be drilled out further inboard. Some accounts suggest 2 mm, others up to 5 mm, but I used a 1.8 mm drill at a point 3 mm inboard from the previous holes.
The original holes were filled once the wing halves had been joined together, using Vallejo plastic putty initially (its clean-up with water makes life a lot easier) and this provided a solid base for some Mr Dissolved Putty. The plastic putty fills the hole but tends to shrink, while the dissolved putty is self-levelling so it does the work for you. Incredible stuff.

With the wing halves joined I then engaged in extensive sanding of the resulting join line. The glue helped with this, but there was still a visible line - literally everything with this kit involves having to go the extra mile.
The tailplane pieces had the same problem, along with a quite confused numbering of parts (the parts are not numbered on the sprue and the diagram in the instructions is not entirely accurate) and this means you have to test fit repeatedly before you glue anything together. Once fitted there will be notable gaps fore and aft of the join but be careful before rushing in to fill these and check your references because the Lysander had movable tail-planes for slow flight. Some gap needs to remain in order to reflect this feature.

7. Test-fitting the wings - once the wings are complete you need to expand the joint for the wing spar because the gap is too small. I find it pretty astonishing that something as basic as this is incorrect and it was at this stage that I started to have real doubts about this build. I used an X-Acto blade and a file to expand the gap in the wings until I was sure of the fit.
8. Clear parts for the canopy. This is where we get to some major problems based around the join of the clear parts with the central wing spar. When test fitting it became clear that the clear parts were too tall to fit between the spar and the cockpit edge, and the gap built into the clear parts to accommodate the spar itself was too narrow. In addition, there was a gap between the clear parts and the sill of the cockpit next to the gunner on both sides of the cockpit. Could this indicate a misalignment of the cockpit cage to which this spar is attached? If I didn't install the cage properly when constructing the fuselage wouldn't this account for the fit problems later in the build? Well no, because the parts didn't fit around the spar vertically or horizontally and this isn't impacted upon by the cockpit cage. Similarly, the clear parts joined perfectly well where they abutted the windscreen, indicating that the parts themselves are the key. Further, the cage was fitted using the attachment points provided, among the very few on the kit, and the only way to establish whether or not they work is to build the entire kit.

The clear parts are, frankly, a dog's breakfast. After much sanding and test fitting which revealed that, while I could get the parts to go into place, I couldn't make everything fit together properly without leaving chasms in some places, I reached the stage where I thought about abandoning the kit. It was only sheer stubbornness that kept me going with the canopy at this point. The problem is further exacerbated with the lack of attachment points on the spar, so you're left trying to join parts together more in hope than in confidence. The side panels are also not the correct shape for the cockpit sill because they bend inward at the rear. I got there in the end, but even then the port side panel was fitted at the wrong angle for the join with the roof.

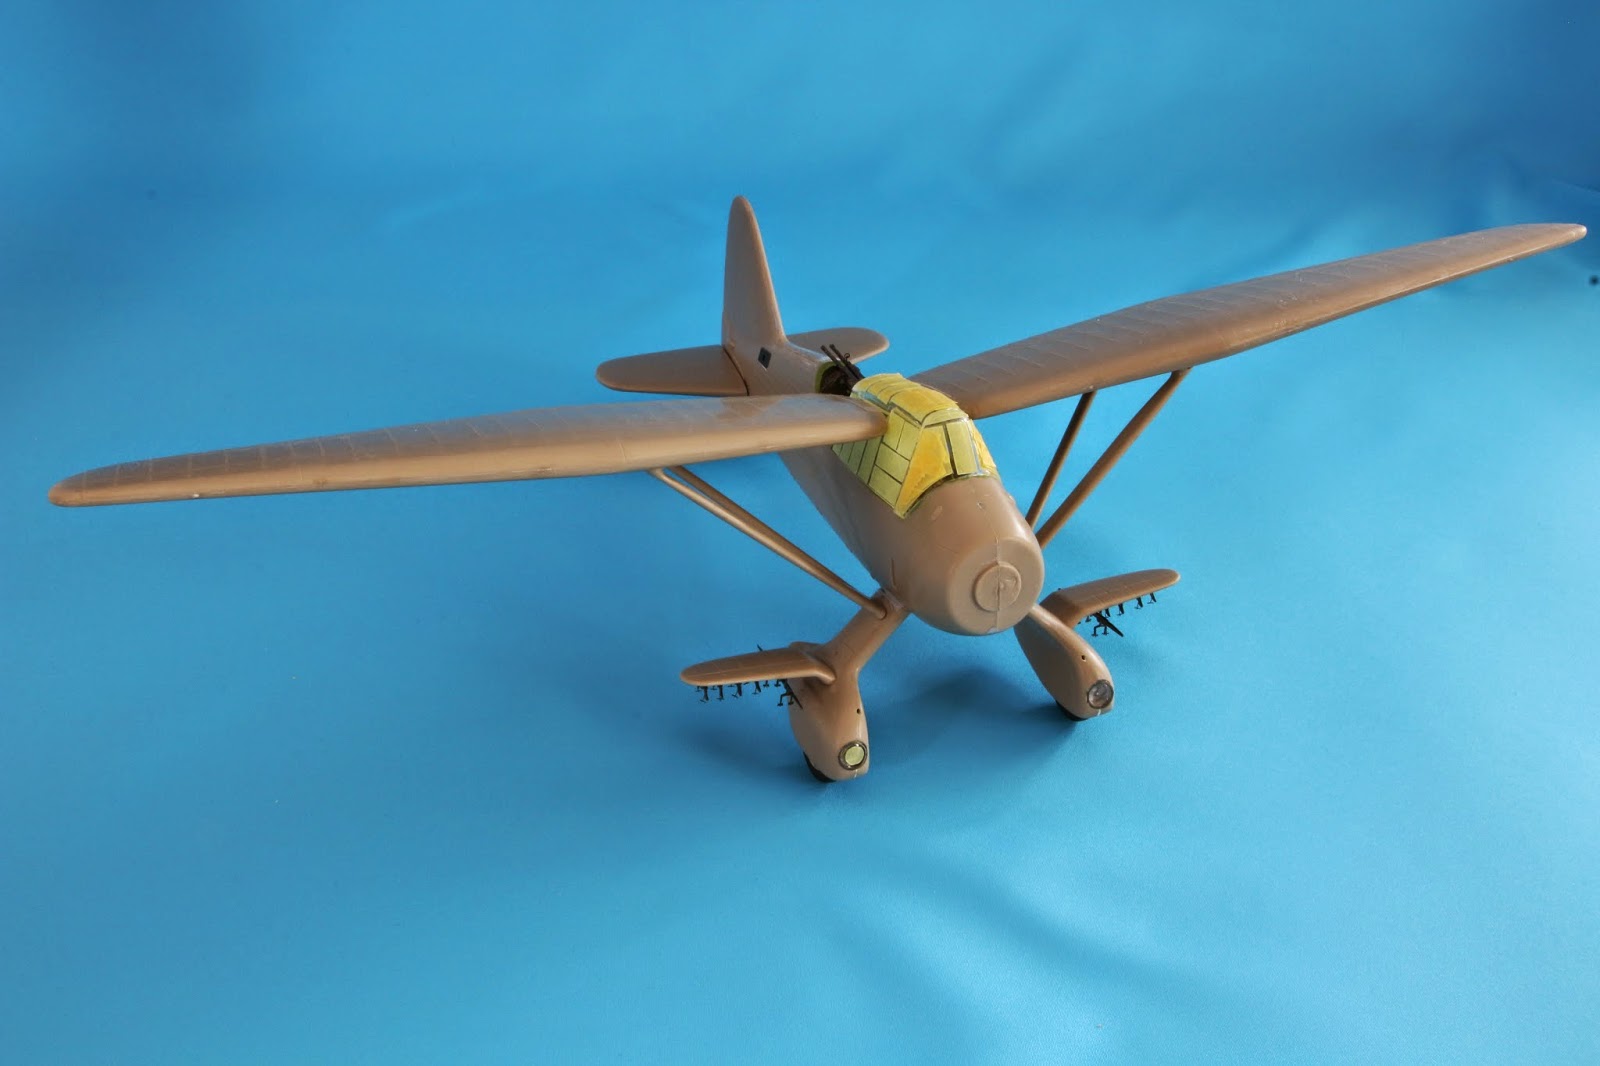
You'll notice that the port side pilot's window is open. I wanted to leave this open both because it allows a better view of the interior but also because I wanted to represent the Lysander's odd system of articulated windows either side of the pilot. Because of this articulation the windows didn't slide horizontally but dropped into the side panels of the fuselage.
Finally, I filled the gap between the rear of the canopy and the fuselage. This was done with plastic card and putty.
9. Fitting the undercarriage. This went reasonably well but, inevitably, the attachment point could have been better.

This was one of those moments when Mr Cement S came into its own because without the ability to turn the fuselage over in order to relieve pressure on the drying parts you're basically stuck holding the pieces in place. With the mushy attachment points this was particularly necessary but we got there in the end and once they were firmly established I allowed the parts to dry overnight.
10. Fitting the wings. Building Great War aircraft has taught me the lesson that trying to fit parts to the underside of a wing in situ is a fool's errand. Do yourself a favour and glue the struts to the underside of the wings first with Mr Cement S, but while still not fully set, fit them to the airframe. Again, they don't fit properly - on the port side where it abuts the canopy the wing fits best, but this is where the clear part against which it sits is actually incorrectly installed, so what does this say? On the other side, where the clear part is at a better alignment there is a gap between the top of the wing and the roof of the cockpit.
I also found that leaving the original attachment points would probably have been fine. Once the struts are installed the whole thing is quite strong but the wings would have been at a perfectly reasonable angle even with the original holes. I fitted the tail-planes after this and supported them with some syringes for paint application since these gave the right angle.
11. Fitting the bomb racks went well but again the parts needed support while the glue set. In this instance I used a couple of rubber thimbles which fit the bill perfectly. Modellers are nothing if not inventive. At this point everything was left to dry overnight.
12. While the drying was happening I got down to painting the metal cowl. It's easier to do this at this stage because it means you're not going to damage the engine and the masking is a lot easier.

As to the colour, well the instructions suggest bronze and various builds use copper, but looking at photographs suggests that neither colour is particularly accurate. At best some cowls have a kind of light copper colour, but some look like dull aluminium and others like pale brass. Most copper coloured paints are pretty dark so I decided against these and went instead for X-31 Titanium Gold over a layer of black Vallejo primer.

The result looks a lot closer to the original than I would have got from bronze and will now be masked up in readiness for painting the kit as a whole.
So that's where we are now. Next I'll fit the engine and the cowl (in a shocking new development, fit could be better) and then I'll sort out the final few pieces of PE, some filling of the joins around the bomb racks, wings and struts, and some odds and ends. Finally I'll mask the cockpit, which I suspect is going to be something of a challenge.
Quite an involved build, then, but at long last I'm almost in a position to start painting. It's a surprisingly large aircraft with an astonishingly wide wing span and, although I'm aware that this has been an unusually negative post, the final kit does look like a Lysander in all its quirky glory.
Zigerastica


0 Yorumlar